Despite the fairways being spread out over a large area yet remaining compact overall, the clubhouse’s central location ensures extremely short distances to both Tee 1 and Tee 10—the paths connecting the individual greens to the next tee are also conveniently short.
While the topography might at first glance make our course seem not quite as physically demanding, the total playing distance of 6,198 meters presents a challenge even to experienced golfers. Windy conditions can add an extra layer of difficulty due to the predominantly open terrain. Large, seemingly flat greens—some with long putting distances—are difficult to read and often “force” a three-putt.
Both 9-hole loops start and end at the clubhouse, offering a great opportunity for a break at the halfway point or for an easy start or finish after or before a half round.
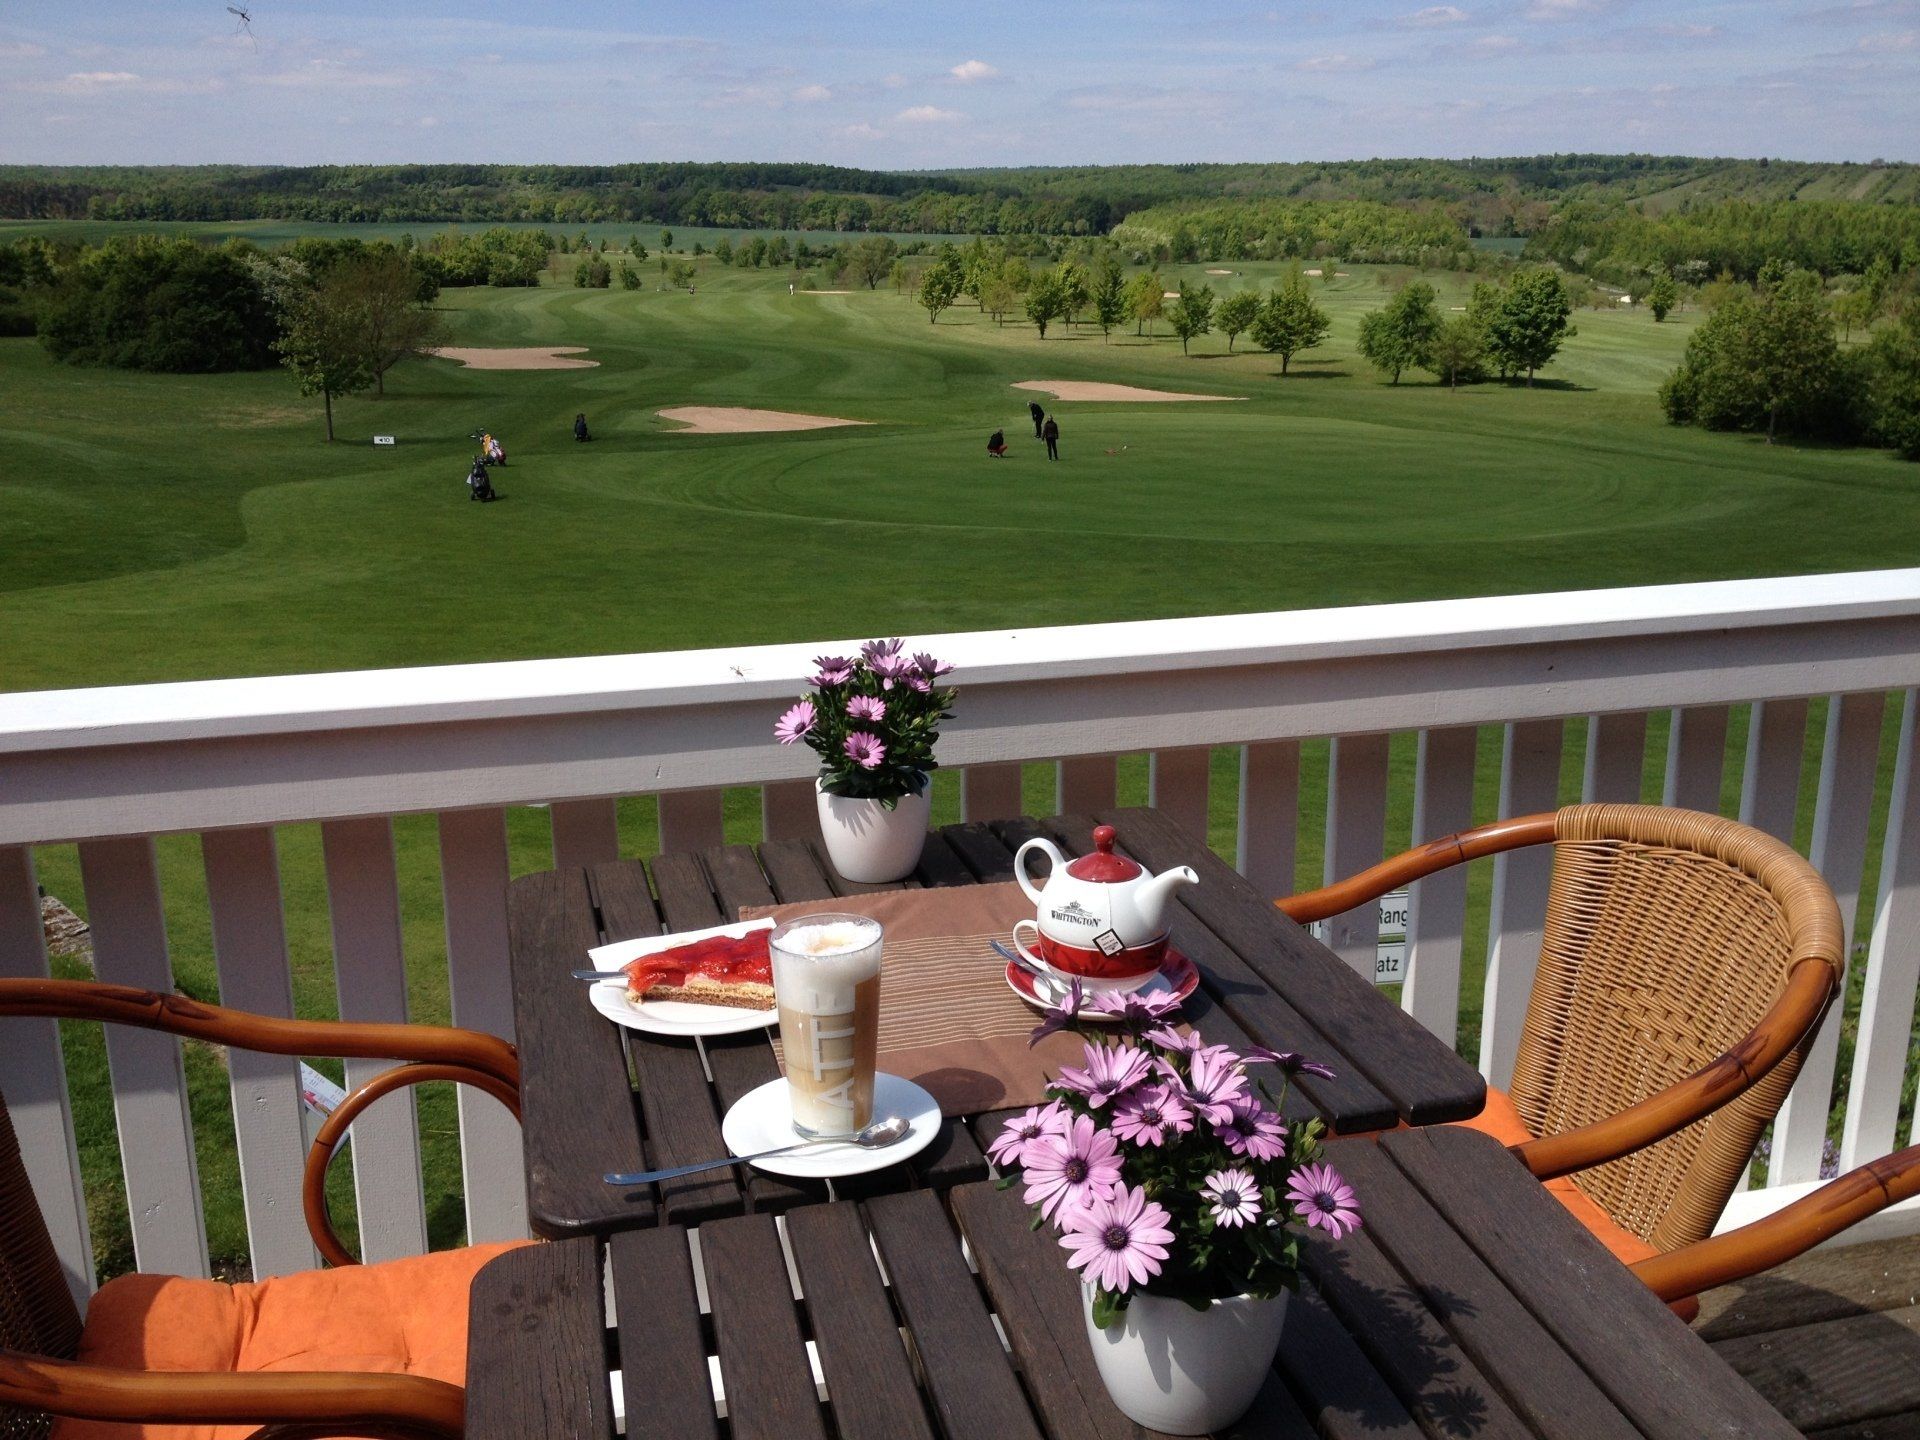
After your round, stopping by the clubhouse’s panoramic terrace is practically a must. Sitting there and letting your gaze wander over the lovely landscape almost always gives you that vacation feeling—even if your score wasn’t quite what you’d hoped for. You can relax and enjoy the view while watching the action unfold on four holes.
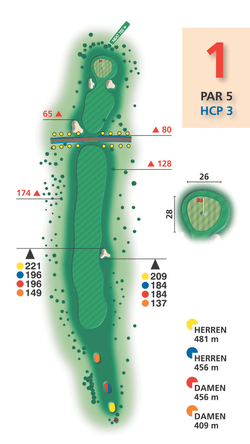
Hole 1
Depending on your skill level, Hole 1 requires a forward-thinking strategy, as there is a path with ditches on both sides that must be navigated about 100 meters before the green. Experienced players aim to reach the top of the first fairway bunker with their tee shot. From there, the second shot can be placed just before the path with the ditches. Since the third shot is slightly uphill and the green is also very deep at 28 meters, choosing the right club is important. Selecting a club one size longer than usual for the same distance on flat ground is certainly a good recommendation. Depending on the flag position, the spacious green also surprises with a small step.
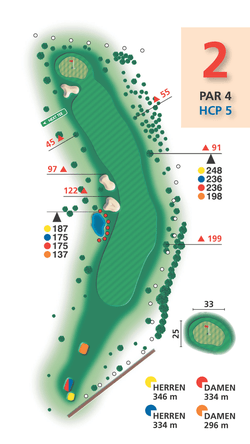
Hole 2
The hole is designed as a dogleg and bends slightly to the left about halfway down the fairway. Strong long hitters can clear the small water hazard—which lies directly in the line of play toward the green—as well as two fairway bunkers from the tee; the ball will then be between 60 and 80 meters from the green.
All other players should stop just past the obstacles visible from the tee. Depending on the flag position—which is clearly visible from this distance (approximately 130 meters to the green)—players should aim for the right side of the green, as the bunker on the left side of the green defends it very effectively.
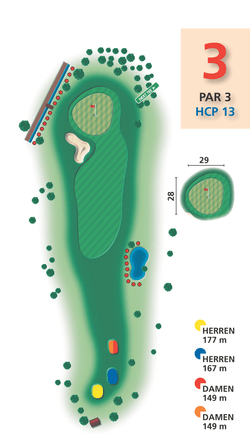
Hole 3
A straight par 3 with its share of challenges. Hardly any “hole-in-ones” have been achieved on this hole so far. This is likely due to the large green bunker lurking on the left and the out-of-bounds area on the right near the green. The rough on the right side of the hole also “swallows up” many poorly struck or sliced shots.
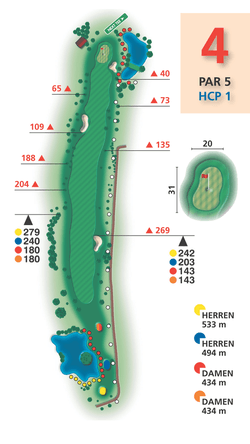
Hole 4
The longest and most difficult hole (Hcp 1)—a full 533 meters from the men’s tee—feels like a par 6 to many golfers, even with just a slight headwind.
The ladies have it easier here—the tee is 100 meters closer than the men’s tee—and since there’s a pond between the two tees, more than a few golfers have had to buy a round of drinks for the ladies after finishing this hole. A rough running along the entire right side of the fairway poses an extra challenge for “slicers” (right-handed players).
Once you reach the green, don’t underestimate its depth (31 meters). When the flag is positioned at the back of the gently sloping green, a small step adds an extra challenge to your putt.
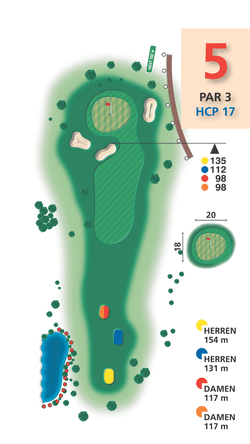
Hole 5
At 154 meters (men) and 117 meters (women), this is one of the easier and shorter par-3 holes. The terrain slopes gently upward, and although three bunkers guard the green, the hole is often played well by golfers of all skill levels.
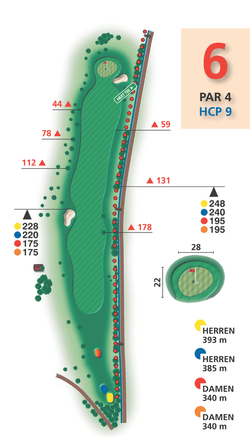
Hole 6
For many men, the 393-meter par-4 hole presents a significant challenge. Despite the frequent tailwind—the hole runs from west to east—it is advisable to pace your shots carefully. A penalty area featuring rough, a row of bushes, and a ditch running along the entire length of the hole on the right side calls for precise shots.
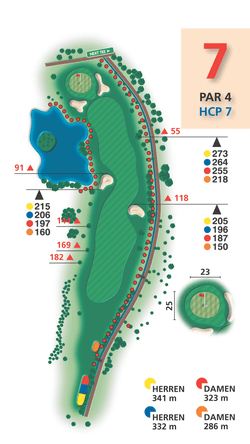
Hole 7
From the tee, the fairway widens in a funnel shape—flanked on both sides by hedges, rough, and ditches. Only after about 200 meters, due to a slight dogleg to the left, does the view open up to the green, which is still about 150 meters away. Anyone aiming to reach the green with their second shot needs solid distance off the tee and precision, as two fairway bunkers lie in the landing zone. Aim slightly to the right off the tee, as this minimizes the impact of the water—with its shoreline vegetation on the left edge of the fairway—and the two green bunkers on the approach to the green.
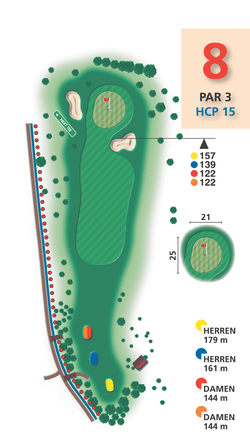
Hole 8
If you want to reach the green in one shot on the 179-meter-long 8th hole (for men), you’ll need a tee shot with a decent carry, as there’s only a relatively narrow approach to the green—one that isn’t protected by tricky bunkers. Any wayward shots from the tee will inevitably end up in the penalty areas on either side.
Hole 9
A hole to savor. The view of the majestic clubhouse—which seems to sit majestically at the end of the fairway with its large sun terrace—makes this hole our “showpiece.” The entire hole is visible from the terrace—but the fact that the terrace is only 40 meters from the green means that, when it’s crowded, players need strong nerves to block out the noise from the terrace during their final shots, especially when putting.
Hole 10
The terrace, with the spectators behind it, and a sloping, broken line of hedges about 100 meters from the tee are likely the reasons this hole is rated a 2. Once you’ve cleared these major obstacles off the tee, all that remains is a green bunker, which comes into play to a greater or lesser extent depending on the flag position.
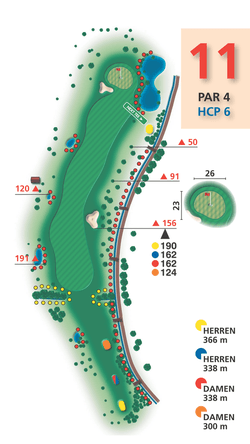
Hole 11
Hole 11 is designed as a slight dogleg to the right. Only the absolute longest hitters can hit a straight drive toward the green. If you fail to clear the fairway bunker and the trees growing there, your drive will usually land in the rough. The shot to the green requires great precision—there’s a bunker on the left, a water hazard on the right, and rough behind the green.
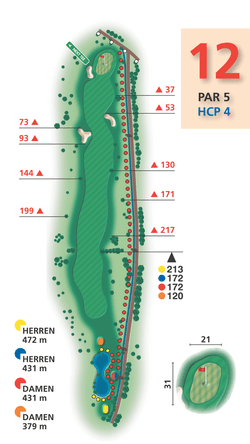
Hole 12
As on Tee 10, the tee shot is a key element for successfully navigating this hole. For men, the shot from the tee carries approximately 80 meters over a water hazard, narrowed by a tree-lined corridor about 20 meters wide. For long hitters and the ladies, a broken line of hedges growing in the landing zone of the tees poses a risk of losing the ball. When aligning for the subsequent approach shots, keep in mind that the entire fairway slopes very slightly to the right, almost imperceptibly. The current flag position must be taken into account when determining the length of the shot onto the 31-meter-deep green.
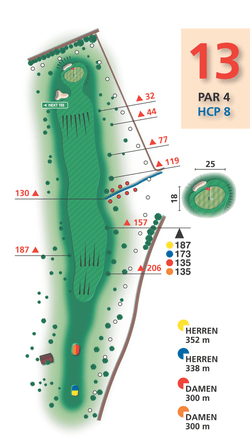
Hole 13
The fairway crosses a hollow, and the landing area for tee shots is located at the lowest point of the hollow and cannot be seen from the tee. As with Hole 13, the fairway slopes slightly to the right overall. The shot to the green is uphill, which affects club selection. A bunker in front of and one behind the green require tactical planning, especially since the out-of-bounds line runs quite close to the green—solid bunker play is therefore particularly advantageous on this hole.
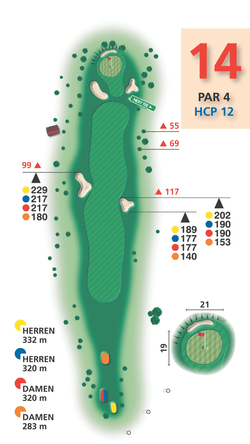
Hole 14
For long hitters, this hole—a short par 4 at 332 meters that also slopes downhill—offers a good chance for a birdie, but the shot must land on the green. Two bunkers in front of the green and a narrow bunker running along the back have dashed many a dream of a good score.
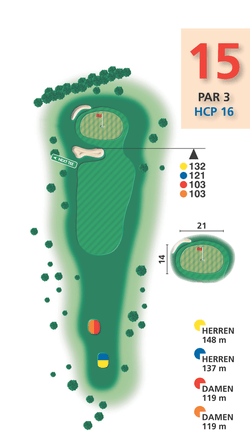
Hole 15
A par-3 hole, uphill, with two very “tricky” bunkers in front of and behind the green. If you can’t reach the green with confidence from your distance, you should approach the flag from the right side of the fairway. The bunker behind the green, in particular, should be avoided. It’s not easy to exit this bunker “under control,” and if your shot goes wrong, the ball isn’t easy to stop on its way back.
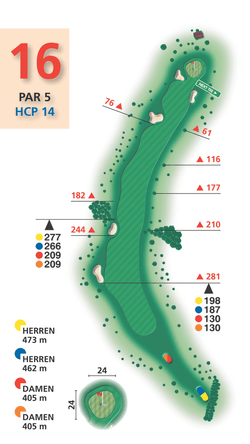
Hole 16
The elevated tee offers a sweeping view over much of the course, the Franconian Steigerwald foothills, and the Frankenhöhe. The fairway itself is laid out as a dogleg to the right, sloping gently to the left. The landing area for teed-off balls is not visible from above. In dry weather, even with relatively short tee shots, you can expect the ball to roll quite a distance on this downhill hole—two fairway bunkers just before the rough ensure the ball stops in time—so it’s important to choose a club strategically, suited to the conditions. With two subsequent shots, the green—which is no longer very far away and is defended by two bunkers—can still be reached easily, not just by long hitters.
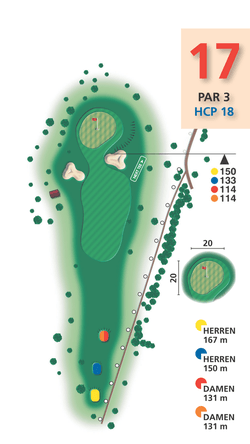
Hole 17
According to the official ranking, this is the easiest hole on the course. If you want to attack the green off the tee, you’ll need a long, high ball flight with as little roll as possible to clear the two green bunkers on either side, since the green slopes down to the left. Another promising strategy is to hit a low, flat shot across the short fairway—which slopes to the left—past the right green bunker and into the approach area.
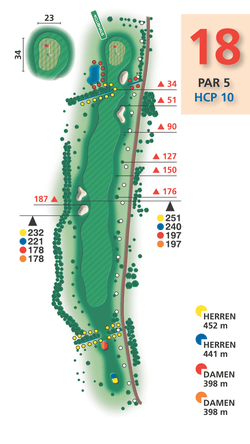
Hole 18
There are two hedges to navigate on the final hole—the first at the tee, the second when approaching the green. In between, the challenge on this par 5 is to strategically plan your shot, depending on your skill level, so that the final obstacles—the hedge and the bunker, which offer only a narrow, direct path to the green—do not prove to be your undoing.
Hole 19
Come on in and enjoy!
For many, the best part of a day on the golf course is winding down in the afternoon or evening sun with a glass of wine, a beer, a cup of tea, or a latte macchiato! There’s always plenty of good conversation! And the food and beverage team will treat you to a solid menu.
Guests who don’t play golf are also welcome to enjoy the view from the terrace!